
So many of you that own a swimming pool don’t know where to start, especially if you’re new to pool ownership. Here I have put together a ‘greatest hits’ checklist for swimming pool maintenance. So many times, I have gone on service calls and these potential clients are practically begging that I teach them how to take care of their own pool. Actually, this gave me the idea to start charging consultation fees. In fact, I remember one homeowner requested that I teach his kids how to maintain the swimming pool, as this would become their chore.
I didn’t have a consumer-ready checklist like this back then, but I have put together a checklist of swimming pool maintenance items that will help you keep your swimming pool in tiptop shape all season long.
This checklist is fairly intuitive. Each heading will explain what needs to be done. Below it, I listed the tools needed (if any), and links to my recommended versions of those tools on Amazon. Below that, the service frequency is listed, and variations that could be encountered, and then how to complete the task. I also provide a couple of pro-tips that might help you out as you go.
If you find this content helpful, remember to subscribe to our email list at the end of this article to stay up to date on all of our helpful content. Now, on to the Ultimate Swimming Pool Maintenance Checklist! (I might be a little TOO excited about this)
Check #1 – Skimming the Swimming Pool
Tools Required: Telescoping Pool Maintenance Pole, Leaf Net/Rake, Leaf Skimmer
Service Frequency: Daily or Weekly. Do this as often as possible or really as often as debris lands in the pool, try to remove debris before it has a chance to sink. Daily skimming is needed on pools with a lot of trees or foliage around them to keep the baskets from being overloaded. Once a week is ok for most.
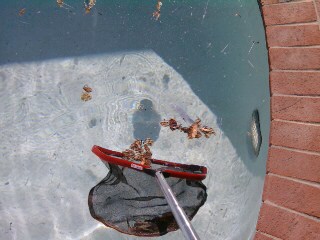
How to do it: Attach the leaf net to your maintenance telescoping pole (t-pole). Personally, I don’t use a leaf skimmer since it’s not really useful in a commercial application, but if you are more comfortable with a skimmer go ahead and use it. Extend your t-pole so that you can reach just beyond the center of the width of the pool, lock the t-pole. Holding the handle of the t-pole reach to the center of the pool surface and draw the net back toward you, capturing as much floating debris as you can. Repeat this process while progressively working yourself around the perimeter of the pool.
Once the debris is cleared from the middle of the pool, collapse the t-pole, then turn it vertically and using the side of the net frame pressed firmly against the waterline, collect and debris stuck to the wall. You may need to repeat this process to get all of the floating debris.
Once the surface is clear, collect large debris that is submerged. Don’t worry about smaller debris, we will get to that soon enough in the vacuuming stage.
Pro-tip: Empty the net often. There’s no worse feeling of disappointment than having a load of leaves fall out back into the pool after you’ve worked so hard to collect them all.
Check #2 – Brush Down Swimming Pool Walls
Tools Required: Telescoping Pool Maintenance Pole, Wall Brush (vinyl or Fiberglass pool), Wall Brush (plaster or pebble pool)
Service Frequency: Weekly. Even if sediment or algae isn’t readily visible, the walls and tile should be brushed to keep algae from setting up shop.
How to do it: Attach the proper brush attachment to your maintenance telescoping pole (t-pole). Starting with the tile, brush the full perimeter of the pool tile at about a 30-degree angle from vertical. Work your way around the pool. For really tough grime and grit on the tile, use a tile brush like this one sold on Amazon.
Next starting near the midpoint of the pool brush down the wall vertically. Brushing toward the main drain if your pool has one, if not just brush toward the deepest part of the pool. Work walking around the pool toward the shallow end (still brushing toward the deep end) working all the way around the perimeter.
Pro-tip: Run your pool circulation system so that it will suck up the debris that gets kicked up by brushing it. You can also use a clarifying agent to help the filter capture the smaller particles. I absolutely love Orenda’s CE-Clarifier + Enzyme for this.
Check #3 – Vacuum the Pool Floor and Walls
Tools Required: Telescoping Pool Maintenance Pole, Vacuum Hose (long enough to reach all parts of the pool), Vacuum Head (for plaster or pebble), Vacuum Head (for vinyl or fiberglass)
Service Frequency: 2x per Month (at least). After sediment and debris has settled from brushing.
How to do it: Attach the vac-head to the t-pole and the swivel end of the vacuum hose. Go to the part of the pool near the suction skimmer. With the main filter pump off remove the skimmer basket and float valve so that you can access the open skimmer pipe. Pool vary quite a bit depending on above ground, in0ground, vinyl, ect… so you’ll need to know you have the right equipment. I’ll put together a future article for this part.
Extend the t-pole so you can place the vacuum head on the bottom of the pool. As you lower the vac head using the t-pole in one hand, in the other hand allow the vacuum hose to slide through your hand. Once the vacuum head is on the floor, you want to force the air out of the hose using water equilibrium. Hand over hand keep the hose vertical pushing it into the water until you have the end. You should see water inside the hose. Connect the hose to the open skimmer pipe.
Now turn the main pump on and set any valves you might have to the skimmer. Now vacuum the pool in an easy to repeat pattern. Either back and forth, up and down, in a spiral around the perimeter, until the whole pool has been vacuumed.
Pro-tip: If there is a good amount of debris that can’t be netted up prior to vacuuming, use an in-line vacuum canister like this one, so you don’t end up clogging your pool pump and losing prime a bunch of times. It also helps so you don’t get a bunch of stuff in your filter.

BONUS pro-tip: Invest in a quality suction side automatic pool cleaner and you won’t have to vacuum as often. Right now, I really like the Hayward Poolvergnuegen. I sell a good amount of these to my existing clients too.
Check #4 – Empty the Bags and Baskets on the system
Tools Required: Garbage Can or Mulch pile
Service Frequency: Weekly. This really should be done as often as possible or really as often as debris lands in the pool. For pools near a lot of trees or foliage, this will be a constant. For indoor pools there will only ever be hair caught in the basket.
How to do it: When the pump is off, open the deck lid to the skimmer, remove the basket, and empty the basket in the garbage or green waste bin, or mulch pile. Replace the basket and the lid. Remove the pump lid, remove the pump basket and empty the basket in the garbage or green waste bin, or mulch pile. Replace the basket and the lid.
If equipped with an automatic pool cleaner and it has a bag or catch canister, you’ll want to empty this at the same interval in the same manner and replace it.
This is pretty easy and straight forward, but you would be surprised at how many of my clients never knew they needed to do this. Especially during windy weather, you may need to do this pretty frequently.
Pro-tip: Replace flimsy baskets that float when the pump is off with heavy-duty weighted baskets. They last a lot longer than the manufacturer’s baskets that came with the pool. I like Val-Pak baskets. Here is a link to the standard U-3/B-9 style basket. Make sure to check what kind you have first, but Val-Pak covers a wide array of styles.
Check #5 – Test the Pool Water and Adjust Chemical Balance

Tools Required: Comprehensive Test Kit, or Basic Test Strips
Service Frequency: Daily or Weekly. This really should be done daily, but most pool owners won’t do that, so we can say weekly.
How to do it: If using a dropwise style testing kit like the Taylor K-2005 that I linked to above, simply follow the directions on the lid. Do the tests in the order shown on the lid. Yellow is chlorine, Red is pH, Green Alkalinity, Blue is calcium hardness, and White is Cyanuric Acid.
If you are using test strips, make sure the strips are pretty fresh, otherwise the test won’t be accurate.
Shoot for the following ranges.
- Chlorine: 2.0 – 5.0 ppm (parts per million)
- pH 7.2 – 7.6
- Total Alkalinity 80 – 120 ppm
- Calcium: aim for about 250 ppm
- Cyanuric Acid 30 – 50 ppm
Pro-tip: any adjustments should be made incrementally. The smaller your pool the more drastic changes will be. Be very careful when adjusting pH, everything in pool chemistry is related to pH, including how effective the chlorine is. Very low or high pH can cause harm to equipment and bathers.
Check #6 – Clean or Backwash The Filter
Tools Required: Backwash hose, Diatomaceous Earth, or Socket set, rubber mallet, high-pressure hose nozzle.
Service Frequency: When the pressure gage reads 10 psi above the starting psi when it was last maintained. Some gages never reach +10 psi, so I typically will say twice yearly as a minimum. I’ve seen some blogs online that state this should be done monthly. I’m not sure if they like the extra work or what, but every single manufacturer recommends the above.
How to do it: Safety is key. Filters are under a lot of pressure. Please follow all safety procedures to relieve the pressure when servicing a filter.
For backwashing D.E. or sand filters, simply turn off the pump and set the backwash handle to backwash. Set up a backwash hose to direct the water where it won’t do any harm and turn on the pump until the water runs clear. Return the backwash handle back to filter. (for D.E. Only) Remove the skimmer basket and float valve from the skimmer. Turn the pump on and add correct quantity of DE slurry as noted on the directions of the bag or filter label.
For cartridge style filters – Turn the system off. Bleed the water from the filter by opening the bleed valve. Open the canister and remove the cartridges. Clean the cartridges with the high-pressure nozzle after soaking in a 20:1 water: acid solution. Or replace the cartridges if its time. Replace the cartridges after cleaning them and reassemble the filter canister. Hit the clamp band with a rubber mallet to seat it as the tension spring is tightened. Turn the pump on and bleed the air from the filter.
This is a quick rendition of how to do this. For a more comprehensive approach to the cartridge filter, check out this article here about tearing down a Pentair Clean and Clear Plus, or my YouTube video here.
Pro-tip: If you notice odd things happening with water chemistry or perhaps your automatic pool cleaner isn’t working, or you can’t vacuum your pool, check the filter first. Many issues are solved with a clean filter.
Check #7 – Regular Checks On Pool Equipment
A Couple Honorary Mentions
No self-respecting swimming pool maintenance checklist would be complete without a few honorable mentions on the list (especially a self-proclaimed ultimate! list). These items don’t necessarily fall into just one of the major categories so I thought I would touch on them each briefly because they should be at least looked at.
Erosion Feeder: If you have an inline erosion feeder, simply check the seal and condition of the plastic every time you open it.
O-rings: Pretty much every service point on a piece of equipment or plumbing has an O-ring to keep pressurized water flowing in the right direction. A leaking O-ring is a loss of efficiency. O-rings should be lubricated with a silicone or Teflon based lubricant. This should be done on a quarterly basis. The primary locations that you will encounter are Pump Lids, filter canister separations, 2 or 3-way bypass valves.
Pool Heater and Pump Maintenance
Our swimming pool maintenance checklist is made for the homeowner so I chose not to include checks with a high degree of difficulty or danger. That said, I still wanted to make sure to mention the pieces of equipment.
Heaters: Most modern pool heaters don’t require much in the way of regular maintenance. If they stop working it’s often due to low pressure from the filter needing to be cleaned. Spiders and other critters like to live inside heaters. Spiders will clog up the gas injectors. This is a good spring startup video by Raypak. Anything beyond these basics should be handled by a professional.
Pumps: There’s not much to maintain on the pump other than checking and cleaning the basket frequently. Replacing the basket when it breaks (it will). When a pool pump starts leaking in the center of the case where the motor is joined, it means (typically) a seal has gone bad. I didn’t want to cover this here since that’s more repair than maintenance, so watch for a future article and YouTube video over at our channel.
The lid almost always has an O-ring that needs to stay lubricated and occasionally replaced. The lid itself and the lock-ring or retainer should be looked at annually in cases of cracks or wear and tear.
Well, there you have it. That is my Swimming Pool Maintenance Checklist. The items that pretty much every pool will have.
Did you find this helpful? Would you like more useful swimming pool maintenance content? Subscribe to our email list to be notified of new content. Go over to my YouTube channel and subscribe there for more content as well.
Have you ever wanted to know exactly WHO was peeing in your pool? Check out this article below.